Printer, Upgrade Thyself

A while back, I thought I bought a 3D printer.

I really ended up buying a boat. That is, defining a “boat” using the colloquial definition of “a hobby or project that seems to require the investment of ever-increasing amounts of time and money, and which often inspires a love/hate relationship and/or an unhealthy obsession with perfecting the design.”

In other words, open-source 3D printer kits are still really tickets to learning about 3D printers. in particular. and many different aspects of engineering, in general. I already had a decent background in electronics, so apart from a few new minor insights, most of the electronics were pretty familiar. I did learn a lot about extruded rail, various fasteners, timing belts, hot ends, extruders, and some of the properties of plastics. I also learned not to trust no-name power supplies.

But one of the coolest features of 3D printers is that they can be used to make themselves into better tools.

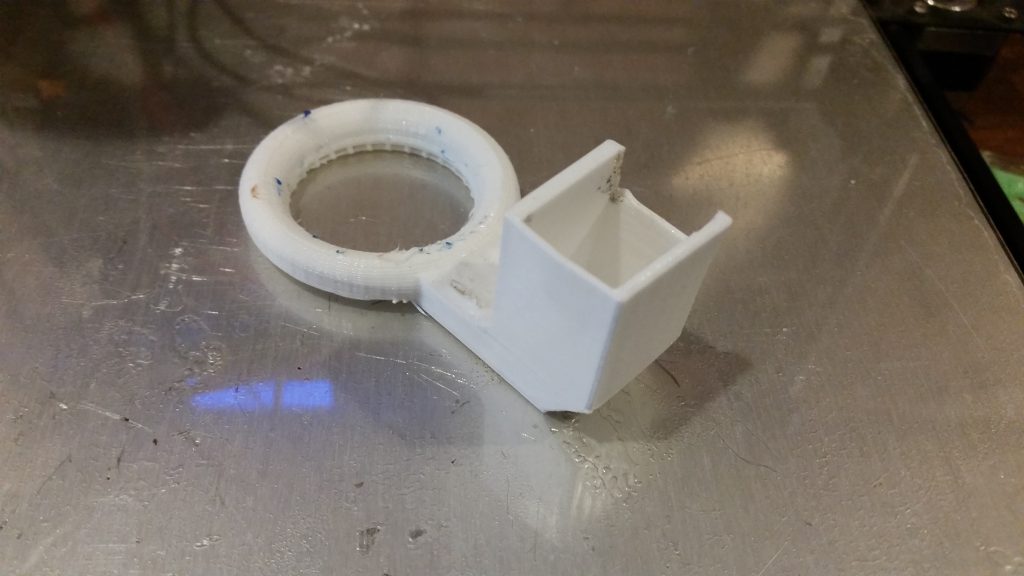
A new fan shroud, as printed, inexpertly hacked on one side, and slightly singed from the hot end.

Somewhere during the process of building the 3D printer, I’d managed to distort the front of the X carriage assembly badly enough that I had to cut it off. (This is the sort of thing that happens when computer engineers dabble in mechanics.)

This meant that the object cooling fan that came with the printer could no longer be attached. I didn’t think much of it until I started trying to fine-tune my part quality, and noticed problems on overhangs. No cooling meant that the plastic was sagging out of position, causing distortions.

Fortunately … I happened to have a 3D printer, if perhaps an imperfect one. This could be solved with the right part!

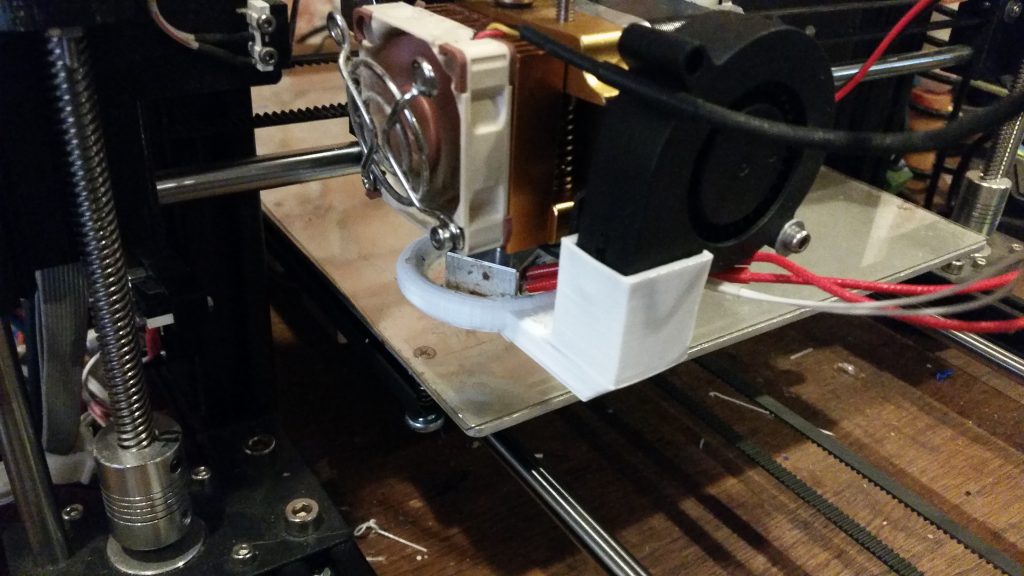
I found a fan shroud design on Thingiverse that looked like it might fit, printed it out, and installed it. This is actually the original idea behind “RepRap”-style 3D printers — that they should be able to make many of the parts for them, themselves. I had to cut into one side and add a washer to get it to work on my printer, but it’s helped significantly with build quality.

The shroud, installed on the printer.

It’s a tiny step towards the Singularity for sure, but it’s still good to have this kind of ability, especially with the recent trend towards consumerism. It’s starting to make sense to make things at home again — and that’s good news.

Because in order to make things, we’re forced to understand them at least a little.

Posted in 3D Printing, Design, Digital Citizenship, Tools | Tagged , , , , | Leave a comment

Programming the DrACo/Z80

Here are instructions on how to program the 8-bit, program counter, breadboard variant of the DrACo/Z80 computer.

  • Set the clock to automatic / oscillator mode (so the clock is running) 
  • Set Program/Run to Program (~BUSRQ low)
    • The address should now be controlled by the counter chip.
  • Enter in the program, one byte at a time:
    • Wait for the BUSAK LED to light
    • Click Up (blue) or Down (green) until you reach the address you want to program. (The buttons can be flaky, but you’ll get there eventually.)
    • Set the logic switches to the data byte to be written
    • Press Write (white button).
    • Click Up or Down to move to the next address
    • Continue until the program has been entered
  • When the program is entered, run it:
    • Press and hold Reset
    • While holding Reset, switch to Run mode
    • Wait for the BUSAK LED to go out
    • Continue to hold down Reset for the length of 15-20 clock cycles
    • If you want to step through the program, switch the clock to Manual. To have it run automatically, leave the clock in Automatic
    • Release Reset
    • If stepping through the program, press STEP repeatedly


Remember to start your programs with a NOP (0x00) in address 0x00. (This is because address 00 is sometimes overwritten when running a program. Extra credit for anyone who can help me track down that particular bug, for sure!)

A note on the Z80’s memory refresh sequence:

After execution of each instruction, the Z80 will perform a refresh sequence, where it will call on the next memory location in the refresh sequence. It uses an overflowing 7-bit counter for this (yes, really), so it counts up from 0x00 to 0x7F before resuming at 0x00.

Suppose you entered the following program:

Address  Data   Instruction
———————————
00             00      NOP
01              C3      JMP
02             00      00
03             00      00

You would see the following sequence of addresses accessed:
00 (NOP)
00 (refresh)
01 (jmp)
02 (00) (part of jmp)
03 (00) (part of jmp)
01 (refresh)
00 (NOP)
02 (refresh)
01 (jmp)
02 (00) (part of jmp)
03 (00) (part of jmp)
03 (refresh)
00 (NOP)

All seems more or less correct at this point, but then you might notice numbers appearing outside your code location:

04 (refresh)
01 (jmp)
02 (00)
03 (00)
05 (refresh)
00 (NOP)
06 (refresh)

It looks like your program is running away — but it’s just the refresh cycle doing its thing. Watch it run for a few cycles until you see the 00 C3 00 00 interspersed with the 00 01 02 03 04 05 etc.

With the static RAM chips we use, we don’t actually need all this refresh silliness — but it’s baked in to the Z80 and can’t be disabled. Modern PC hardware does include refresh functionality, but it’s essentially abstracted away at this point, from a programmer’s perspective.

Posted in Assembly, Coding, Digital, DrACo/Z80, Drexel, EET325, Electronics, HOW-TO | Leave a comment

Evolved Art

Computers are thought of as unthinking, logical machines. However, it is still possible, in a way, to ask a computer to create specific kinds of abstract art — sometimes without directly specifying what it should look like.

Genetic algorithms (which I’ve played with before) represent problems to be solved as sequences of bits. For example, an uncompressed RGB bitmap could be represented as 24*X*Y bits, where X and Y are the width and height in pixels of the picture in question. These bits can then be treated as genes — subject to crossover, mutation, and perhaps other operators when creating a new generation.

The key is the fitness function. Each candidate solution is tested to see how well it works. It is assigned a score on some arbitrary scale by the fitness function. A simple fitness function for pictures, for example, might award a positive score for blue and green, and deduct points for red. This would eventually lead to a picture of pure cyan pixels (#00FFFF).

Similarly, an existing picture can be used as a fitness function. As the candidate solutions blindly evolve, selection pressures ensure that more child genomes drift towards the optimal solution (the search space here is linear and smooth.) Eventually, over the generations, the picture emerges.

In the above video, bytecode genomes are interpreted as wire art. Every pair of bytes represents one 16-bit polar coordinate — one of 65,536 equally-spaced points on the unit circle. Two such pairs make a chord; a virtual “wire” can be strung between them, changing pixel values in the area inside the circle.

In this run, a fixed population of 150 genomes of length 1400 (representing 350 wires) are evolving. Each generation, each genome is evaluated in terms of how closely it would match the target image, if interpreted as polar coordinate wire art. Pairs of genomes are chosen at random, and a sort of contest is run. The genome of the two with the higher fitness score is more likely to be chosen to reproduce. In this way, genomes which code for wires that contribute helpful pieces of the target image are selected for.

(Monochrome wire is used in this run, but greyscale and full RGB color are also possible. I’m using monochrome here, since it’s faster.)

The scientific community has known for over a century that Darwinian evolution works. But it’s still fascinating to see it for yourself in real-time.

Posted in BASIC, Coding, Math, Science | Leave a comment

TunnelBear

“Thanks” to the recently-passed S.J.Res. 34, ISPs now are legally permitted to sell the Internet access history of their customers. Good job, you crooks.

This is a bald-faced sellout by a Congress intent on wringing every dollar they can for their corporate buddies from the public. Had Ma Bell tried to sell our phone history back in the day, new management would have been quickly installed by a mob armed with torches and pitchforks. Do we really want to live in a world where our every action is available for purchase?

I don’t. So I bought a bear. Specifically, a TunnelBear.

The delivery may be whimsical, but the idea behind it is sound. If our ISPs are legally allowed to sell our private browsing history to the lowest bidder, it falls to us to leave them nothing to sell.

VPNs are nothing new. The name “Virtual Private Network” is pretty accurate — it allows you to securely and privately join a remote network by exchanging encrypted communications over an untrusted link (the Internet in general and now even our own ISPs.)

So TunnelBear.com (for free, for the first 500MB per month, or unlimited for a low-cost subscription) allows users to securely and automatically connect to various networks that they have set up around the world. ISPs only see encrypted browser traffic to TunnelBear’s servers, not the contents or even the final destination. You browse as usual, and the requests come from some anonymous server in … wherever the VPN server is.

Non-techie analogy: The “bear” (the VPN software and VPN servers) securely “tunnels” your data to another location, so your ISP can’t see what you’re doing and sell your private data.

There’s a bit of a performance hit, but not as bad as you’d expect. My 150/150 FiOS connection got me about 75/50 through the VPN, which should be more than enough for even HD video. More importantly, inbound ports still work — TunnelBear seems to only catch outbound browser traffic.

With the recent political climate, I think we’re going to see more VPN providers. The peace of mind is worth it.

Posted in Current Events, Digital Citizenship, Internet, Networking, Reviews, System Administration | Leave a comment