Intercalatory Interpolation

Calendrics — the science (and art) of calendar creation — can be fun. Our traditional timekeeping system includes various units of time: seconds, minutes, hours, days, weeks, months, and years — but not all of these correspond to observable phenomena or always line up nicely with each other.

Each February 29th provides a nice opportunity to take a step back and look at the specifics of the current Western calendar — the “Gregorian calendar.” Our current calendar is a subtle-but-important modification of the previous (Julian) calendar. The modifications, made by Pope Gregory XIII, no doubt on the advice of astronomers, were designed to make a one-time correction to the calendar to realign dates with their proper respective seasons, and to make a subtle lasting change to the number of leap years so that the calendar would not continue to drift (at least as rapidly).

We define a solar day as the time it takes for the sun to return to the same apparent position in the sky. It takes a bit more than 365 of these solar days (one tropical year) for the Earth to go around the Sun once, returning the Sun to the same apparent place with respect to the background of stars. With just basic astronomical observations over the course of a few years, it was determined in antiquity that every fourth year needed to be one day longer to keep things in sync. This, plus the almost-but-not-quite-even splitting up of the year into the months we are familiar with, became the Julian calendar (named after Julius Caesar).

The Julian calendar worked fairly well, but by 1582, the year was some ten days out of sync: the equinoxes occurred some ten days earlier than their traditional, expected time. The Gregorian calendar, implemented by fiat by Pope Gregory and slowly adopted by non-Catholic nations (since it also happened to make good mathematical sense), subtly modified the Julian calendar as follows:

  • Every year divisible by four is a leap year, except
  • Every year divisible by 100 is not a leap year, except
  • Every year divisible by 400 is a leap year.

Therefore, 1900 was not a leap year, but 2000 was. (There won’t be another millennial leap year until the year 4000.)

This scheme keeps the calendar closely enough in step with the Earth’s movement through space that the largest errors are now due to the gradual slowing of the Earth’s rotation. This has led to the modern (and somewhat controversial) practice of adding “leap seconds” to civil time, as required by variations in the Earth’s rotation. Leap seconds work similarly to leap days: every so often, the final minute of June 30 and/or December 31 is lengthened by one second:   23:59:58  –>  23:59:59  –>  23:59:60  –>  00:00:00 .

Some minutes have 61 seconds...

As for me, I’m definitely in favor of leap seconds. They’re a nice solution to the problem of small-scale calendric drift, and add a bit of statistical excitement to the subject, as well. If the Powers That Be are in an abolitionary mood, though, they could always do us a favor and get rid of Daylight Saving Time.


Posted in Math, Science | 2 Comments

Soldering For Road Warriors

Radio Shack really seems to be making an effort to reach out to electronics hobbyists. Five or ten years ago, I had all but given up on finding useful components or tools there, unless what I needed happened to be AA batteries or a new cell phone. Recently, though, Radio Shack has started to stock more parts and better tools, including some pretty decent soldering gear.

I’ve used Radio Shack’s portable butane soldering iron for a couple of years now; it’s very convenient and works well — but is large and massively overpowered for most of the work I do, even when throttled back to its barely-on minimal setting. My Weller temperature-controlled setup is much more suited to embedded design work — but is quite bulky, requires AC power, and is not designed for portability.

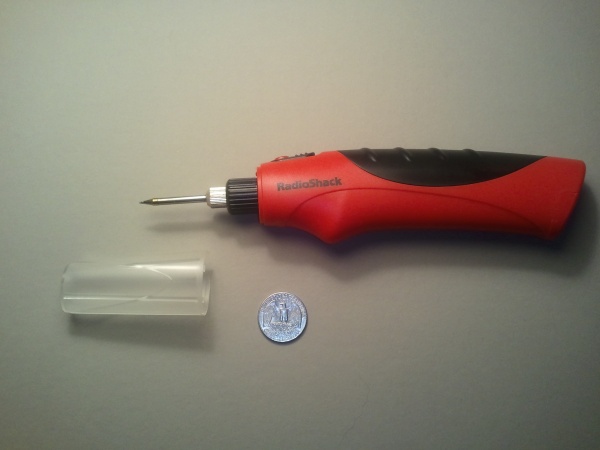
Finally, though, there seems to be a middle ground. Radio Shack’s cordless battery-powered soldering iron seems to work quite nicely for portable, cordless work on small electronics projects. (I recently used it to solder 90-degree headers onto a cool little 5Hz GPS unit from SparkFun.) For $20 (on sale for $15, apparently), it’s a steal.

Just add solder and four AA batteries. (Click for larger.)

Operation is pretty simple: move the switch to the ON position and hold down the momentary-contact switch. Despite the fact that the packaging says it takes a few minutes to warm up, it’s up to temperature very quickly: hot enough to melt .015″ 62/36/2 solder within about seven seconds, from a cold start. Ignore the directions on the packaging entirely, in fact, since it’s evident from some of the instructions (“Tin the tip by plugging in the iron and letting it heat fully…”) that at least some of the text was copied verbatim from another product. At least they didn’t get the description exactly wrong this time.

I have yet to see how long the batteries last in typical use, but since power is only applied while holding down the switch, there’s at least no need to worry about leaving it turned on. When powered on, a small white LED lights up the work piece a bit, too. This serves as both illumination as well as a nice “power on” indicator.

Here is a quick right-angle-connector soldering job I did with the iron, while away from my home lab. Considering that I wasn’t really taking my time or working with a magnifying glass etc, it did a nice job.

A right-angle connector soldered using the iron. (Click for larger.)

It won’t replace my Weller, but it is certainly well deserving of a place in my “go-bag” toolkit. If you do small-scale electronics work away from your workbench, I’d recommend picking one up.

(My only relationship to Radio Shack is as a customer; I like the direction they’re taking as far as support of electronics hobbyists, and feel they deserve the publicity.)

Posted in Electronics, Reviews, Tools | Tagged , , | 1 Comment

BitTorrent explained

The BitTorrent peer-to-peer file sharing protocol takes advantage of the fact that clients can upload as well as download. With both the clients and the server contributing to distribution of files, information can be shared much more quickly than would be possible with the clients downloading from the server alone. In addition, with BitTorrent, files can remain available on the network even if the original hosting server is taken offline, as long as the nodes which are still connected collectively have all of the pieces of the file.

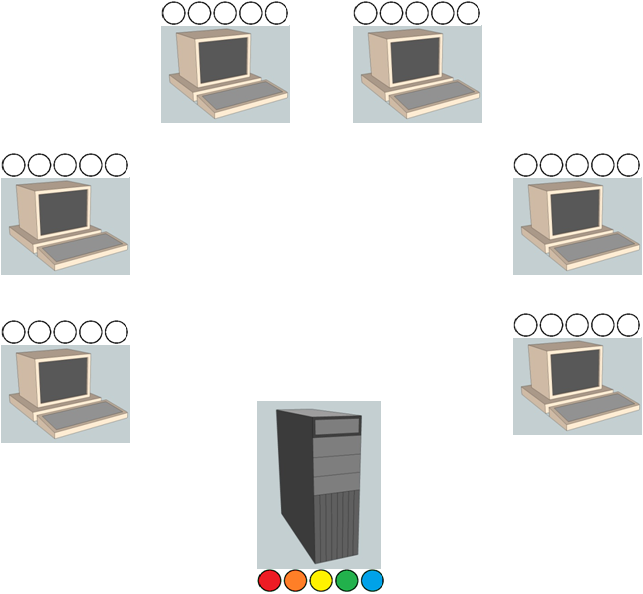
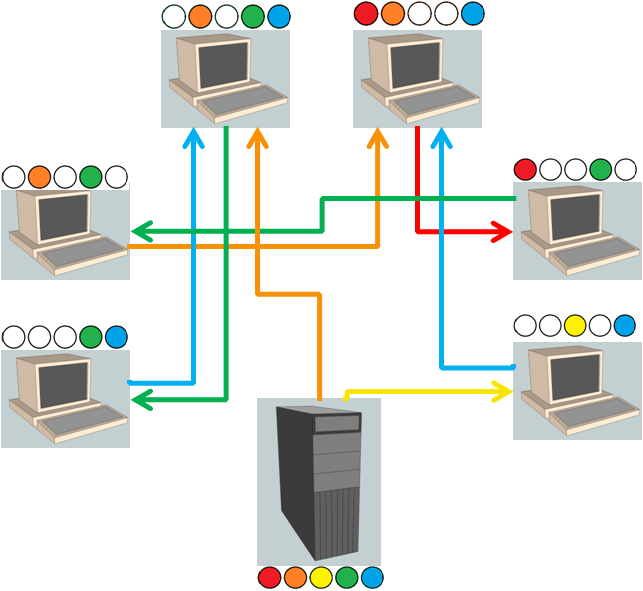
Here is an example of how a file could be distributed from a single server to six, and then eight, client nodes. The assumptions made here are that the server has enough bandwidth to upload two pieces of the file at a time; clients can download two pieces and/or upload one piece. Although the file in the example is shown as broken into five pieces, in reality, large files would be broken into hundreds of small pieces.

At the start, the server has all five pieces of the file;
the clients don't yet have any.


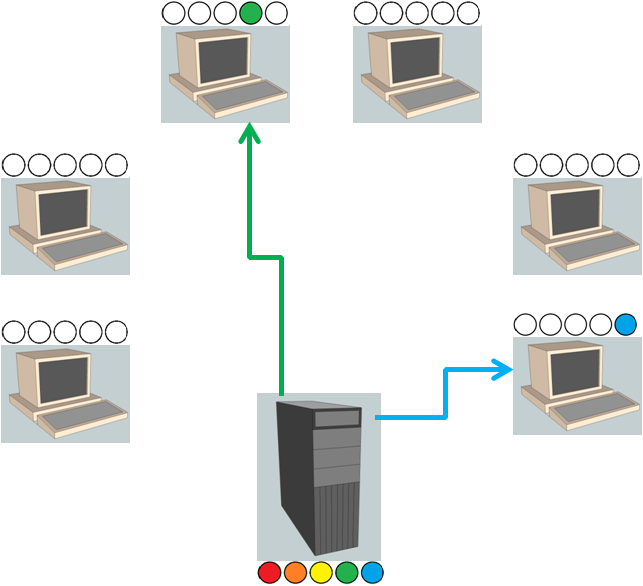
The server uploads two (different) pieces to first two requesting clients.
These clients now each have one piece and can upload them to others.


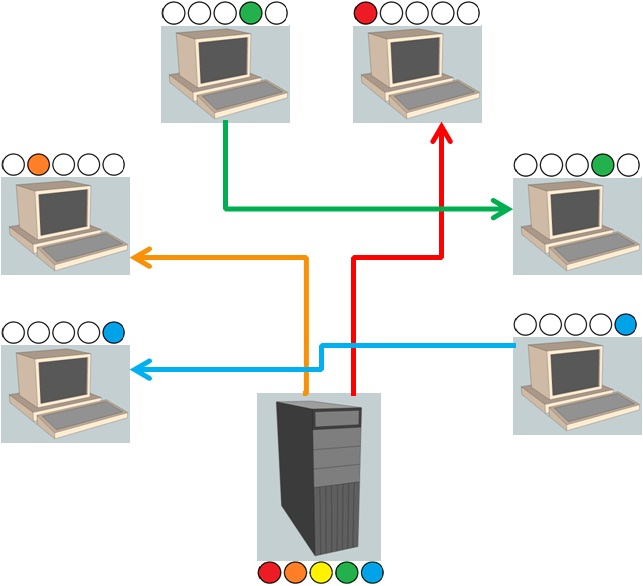
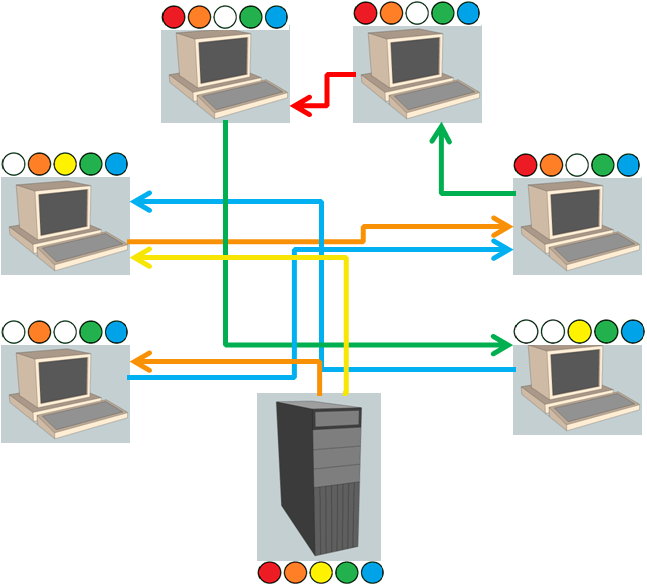
The server uploads two more, different pieces to two other clients. The first two clients which received pieces start sharing them, speeding up sharing.


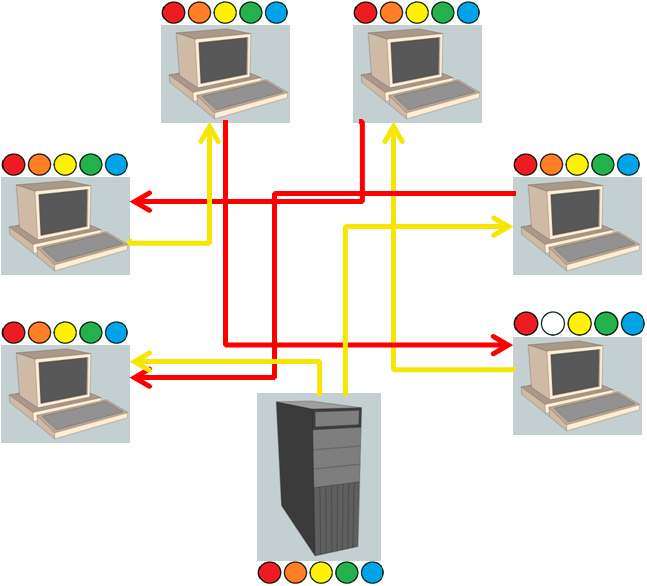
The server uploads two more pieces, including the only piece not yet shared. All six clients also share pieces they already have; the “torrent” is in full swing!
(At this point, all pieces would be available even if the server disconnects.)


The server continues to upload pieces, and the clients continue to share pieces among themselves.


The sharing continues, filling in the pieces that clients don’t have yet…


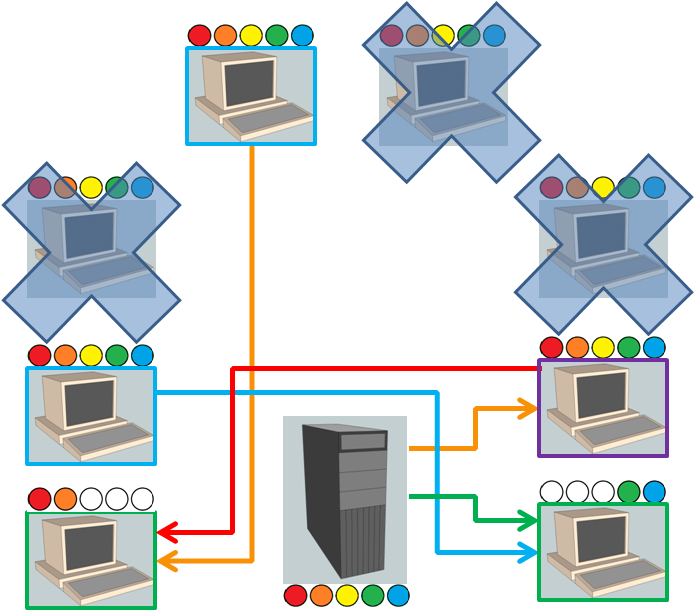
Three “leecher” clients (shown with X) disconnect once they have all the pieces. The remaining client (purple) downloads the last piece it needs. Two new clients (green outline) come online; they receive from the server as well as “seeding” peers (blue outline) still in the network.

Posted in Digital, Internet, System Administration | Leave a comment

Arduino motor control shield

Is there anything that can’t be done with the right Arduino shield?

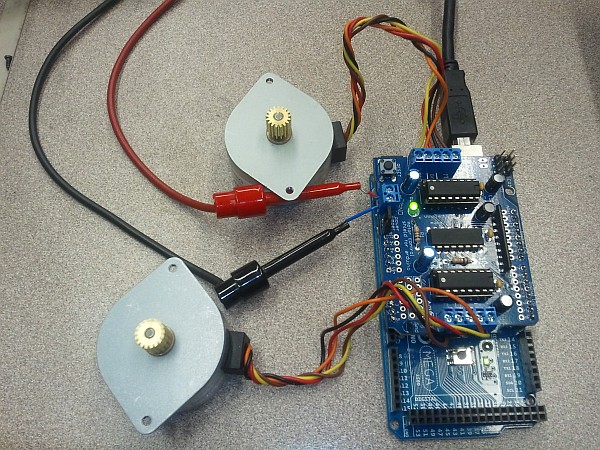
Adafruit makes a nice motor control shield that can control up to four DC motors or two stepper motors, as well as two servos. Since it uses L293D H-bridge drivers, it can use an external supply of up to 36V to drive the motors — and can pass up to 1A per motor. For higher-power loads, some heatsinking may be needed, but the board handles a pair of 12V, 100 ohm unipolar stepper motors nicely. The board can use all of the standard stepper motor drive modes (single-pole, double-pole, interleaved, and microstepping) — and drive modes and speeds can be switched on the fly.

The Adafruit motor control shield driving a pair of unipolar stepper motors. (Click for larger.)

The board comes as a kit, but since it is well-thought-out, uses all through-hole components, and has excellent assembly instructions available online, it’s straightforward enough to assemble. I wouldn’t recommend it as a first soldering project, but if you have a decent temperature-controlled soldering iron and can solder DIP16 components, you should be OK.

Like nearly everything Arduino, the board doesn’t ship with drivers or instructions — but it does have the support URL silkscreened onto the board. Since the drivers and assembly instructions have probably been refined since the board was made, this is a good thing; you automatically get the latest version of the drivers and instructions. Costs are also kept down, since there’s no need to include a CD-R for a few hundred k of files.

The software side of things is very straightforward, too. Copy the provided driver library into the Arduino Libraries folder, and with an include statement and a few lines of code, you’re up and running. (The provided examples are a great starting point.)

Overall, the board is great. I can definitely see ordering more of these as projects warrant. About the only improvement I can think of would be to include proper extensible Arduino header pins, to allow other shields to be stacked above this one. (This would require some layout changes, though, since more pins would have to be carried through.)

Posted in Arduino, C, Coding, Digital, Electronics, Reviews, Robotics | 1 Comment