The advent of easy-to-use development ecosystems like Arduino have made a lot of embedded design tasks, such as obtaining GPS positions or controlling LCD displays or servo motors, significantly easier. Tasks which would take many hours to implement in assembly (a square root function for distance calculations, for example) are easily implemented in a single line of C or C++ code.
Often, though, there is a performance penalty associated with blindly using C or C++ code and making calls to library functions. If these functions are not used as intended, a significant amount of processor time can be wasted in unnecessary housekeeping.
While investigating the possibility of migrating our EET401 Microcontrollers course to the Arduino platform, one of the professors with whom I work ran some quick tests on an Arduino Uno, to test its clock-cycle efficiency. The results he got were startling, and warranted further investigation. Here is a recreation of these experiments, along with an brief explanation of what is going on.
The Arduino development environment comes with the basic example code to blink a LED:
void setup() {
pinMode(13, OUTPUT);
}void loop() {
digitalWrite(13, HIGH); // set the LED on
delay(1000); // wait for a second
digitalWrite(13, LOW); // set the LED off
delay(1000); // wait for a second
}
This results in the LED (connected to Pin 13 on the Arduino Uno) blinking on and off at a rate of right about half a Hertz (one second on, one second off). The code is straightforward and easy to understand — and for an application like this, performance isn’t an issue.
Here’s the same sketch, with the delays removed. Intuitively, this should turn the pins on and off as fast as possible, since the loop appears to be doing nothing else.
void setup() {
pinMode(13, OUTPUT);
}void loop() {
digitalWrite(13, HIGH); // set the LED on
digitalWrite(13, LOW); // set the LED off
}
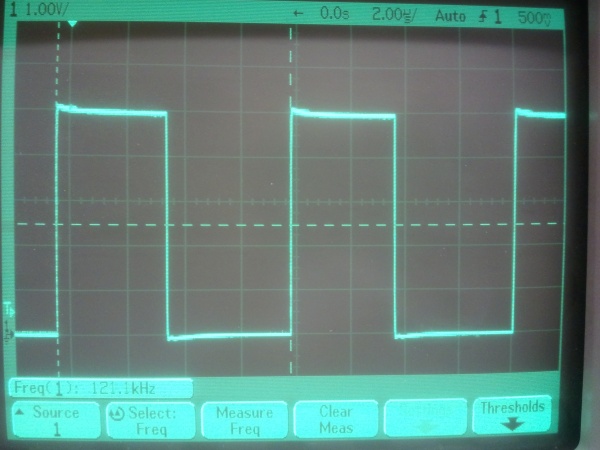
Intuition can sometimes be deceiving, though. This code results in a square wave of only about 121kHz. Since the AVR microcontroller on the Arduino runs at a speed of 16MHz, this represents about 133 system clocks per cycle, just to turn one bit on and off. What’s going on?
As it turns out, the calls to digitalwrite() are responsible for much of the delay. This routine is actually fairly efficient at what it is intended to do, but is far too general to be good at high-speed operations like this. It accepts a variable input, chooses which pin to change, then looks up the correct memory address and makes the change. All of this is accomplished in about twenty or so clock cycles, which isn’t bad when you think about it.
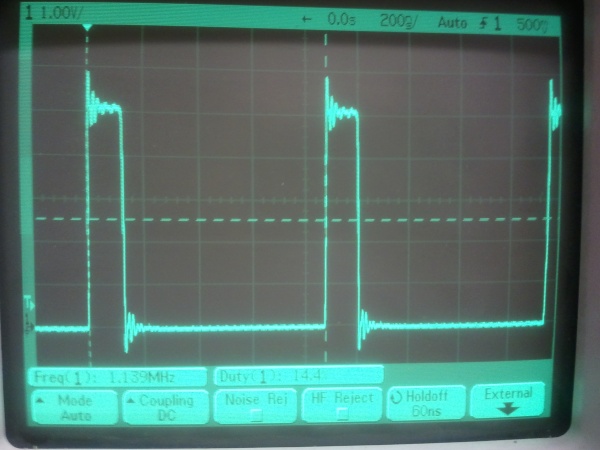
Such fancy options aren’t necessary when going for pure speed, though, so in this case there are better options. Re-writing the program to replace the calls to digitalWrite() with Boolean functions that write directly to the output port improves the frequency to 1.14 MHz. This is nearly a 10x improvement — but the short 14% duty cycle implies that there is still quite a bit of optimization that could be done in the loop itself.
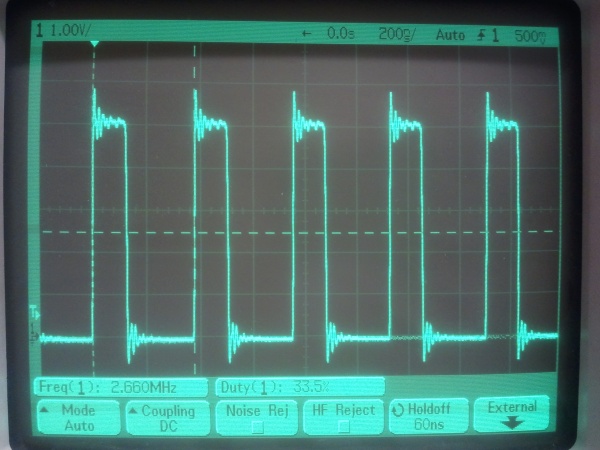
Using a while(1) loop to surround the port-on and port-off statements eliminates most of the remaining delay, improving the frequency to 2.66MHz, with a final duty cycle of ~33.5%. 2.66MHz represents 1/6 of the input clock frequency, so apparently each operation (bit-on, bit-off, and loop) takes two clock cycles. This is probably optimal, and is better than would be possible in PIC assembly at 16MHz (four clock cycles would be needed for each bit operation, and eight for the jump.)
Here is the final code used to get the 2.66MHz signal shown above:
void setup() {
pinMode(13, OUTPUT);
}void loop() {
while(1){
PORTB |= 0x20; // set the LED on
PORTB &= ~0x20; // set the LED off
}
}
In conclusion, compiled C code can indeed be as efficient as handwritten assembly code — but it’s important to know the overhead associated with calls to library functions. The Arduino environment was built for ease of use, not lightning speed. Considering everything that functions like digitalWrite() do, though — addressing pins based on a variable, setting PWM states correctly etc — the efficiency of these functions is actually pretty good. It’s a question of using the right tool for the job.


