Craftmanship in Engineering

There’s Hacking, then there’s Engineering, then there’s “Doing It Right.” For me, Doing It Right is always something to aspire to, even if I don’t always have the time, tools, or expertise.

Recently, my granddad (94 years old today and one of the most inspiring people I know) gave me a notebook that he had kept roughly sixty years ago, while working for Capital Airlines (later part of United Airlines.) It’s full of great information and fascinating details about 1950s airliner technology — Lockheed Constellations and Douglas DC-4s, including details on specific aircraft owned by Capital Airlines. I’m working on scanning it in, and will post the whole book on this site when done, since he was kind enough to give me his permission.

An unassuming notebook, but one filled with information!


Talking with my granddad about engineering topics — anything from multi-row propliner engines to repairing an AC blower in a Chevy van — has always been inspiring. Here is a guy who dedicated his career to Doing It Right. (How many people not only follow the proper maintenance procedures for their lawn mower and generator, but keep detailed records of the work done on a clipboard in the shed?) I’m still learning from his example.

Here are a few of the highlights I’ve found so far while going through the notebook. (I’m working on uploading higher-resolution versions.)

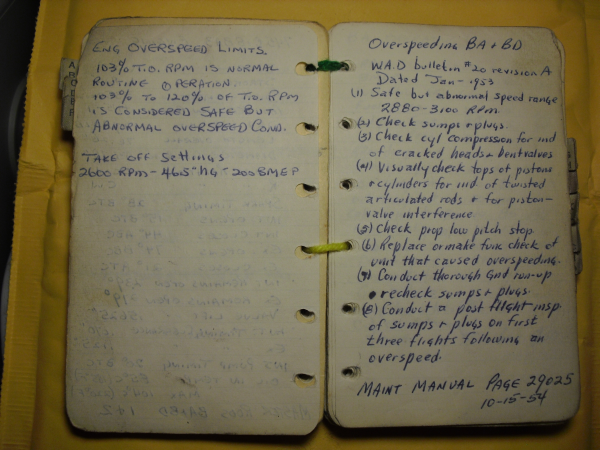
Apparently there's OK-overspeed and too-fast-overspeed.


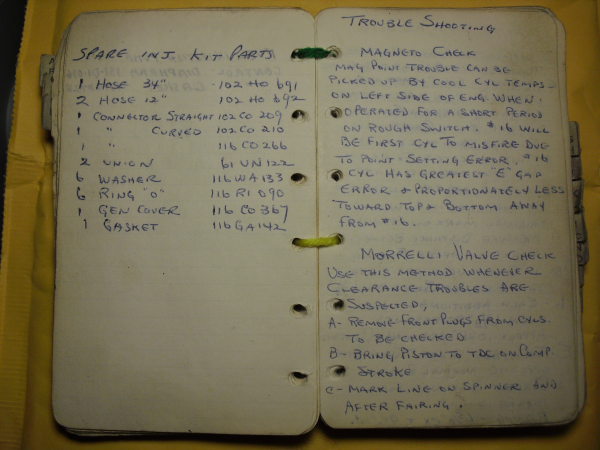
Magneto troubleshooting procedure. #16 cylinder will be the first to misfire.


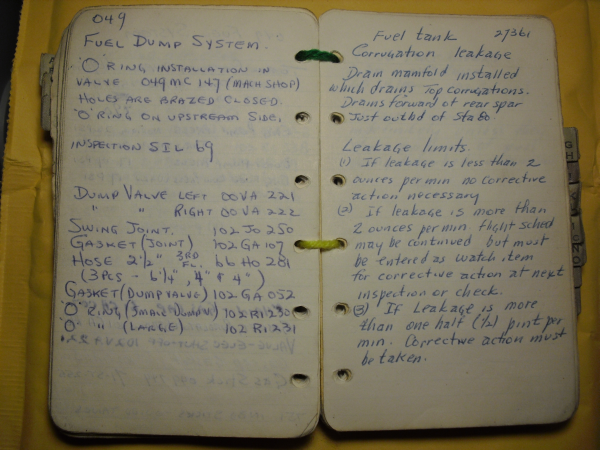
Sometimes a fuel leak is OK, and sometimes it's not. Here's how you tell.


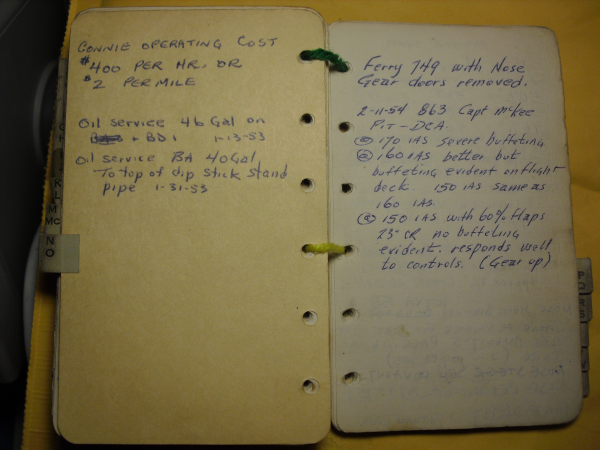
Ferrying a Lockheed Constellation with the nose gear doors removed. Buffeting was experienced until the flaps were lowered (which would put the plane in a more nose-down attitude.) That must have been quite an adventure!


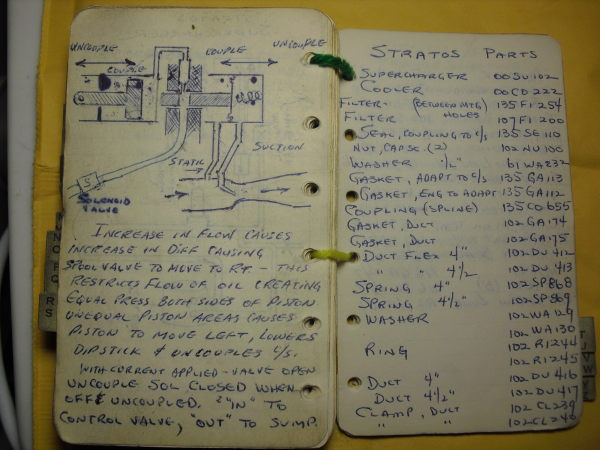
A hand-drawn valve diagram. Artistry was the AutoCAD of the day!


Qualified to service Lockheed Constellation aircraft!

Happy birthday, Granddad — and thanks for being such a great role model for several generations of engineers!

Posted in Aviation, Nostalgia | Tagged , , , , , , , , | 2 Comments

A Bluetooth-Controlled Robot

The SIGMA walking robot (which I’ve written about before) is now a bit closer to completion: a wireless control link (via Bluetooth) has been added, allowing the robot to be “driven” using an Android smartphone. Links for the source code, schematics, etc are given below; email me or post a comment if you have any questions.

Here’s a video of the robot in action:

The control chain works as follows: accelerometer inputs on the phone are read by an app coded in Mintoris BASIC (which I highly recommend if you have an Android device and enjoy programming in BASIC.) The BASIC app chooses the desired gait (stopped, forwards, backwards, turn-left, turn-right, spin-left, or spin-right) based on the accelerometer inputs (essentially, which way the phone is tilted). This is translated into commands that are sent via Bluetooth to a SparkFun RN-41 Bluetooth module, commanding it to set four of its output pins high or low. This in turn commands the servo microcontroller on the robot to implement one of the seven above behaviors by sending position pulses to the robot’s eight Futaba S3003 servos. (The robot currently understands thirteen different postures and motions, but not all of these have been implemented in the phone control so far.)

The control block diagram for the Bluetooth link

The electrical design for the robot itself is fairly straightforward; here is a short description of each piece:

  • Power is supplied by a 6V rechargeable NiMH battery pack (I’m using a Duracell DR10 since it was handy). This supplies the main power for the servos and the PIC microcontroller. (6V is technically out of spec for the PIC, which should only run at up to 5.5V. It seems to work well enough for now, but I do plan to regulate the PIC’s supply voltage down to 5.0 when I make a new circuit board. Separating it from the servo supply now would be tricky.) The switch at the back of the robot interrupts the main 6V power line.
  • The 6V rail power from the battery is cleaned up (at least to some extent) by two large 22oouF electrolytic caps, as well as a 1uF tantalum. (Servos tend to have large swings in supply current requirements, which can cause the supply voltage to bounce around quite a bit due to the impedance of the wires and battery.)
  • Power for the Bluetooth module is regulated down to 3.3V from the main 6V power rail, since the Bluetooth module is not rated for even 5V. An adjustable LM317 regulator (and associated voltage-divider resistors) is used for this. An 0.1uF tantalum cap and 0.01uF ceramic cap help clean up the 3.3V power.
  • The PIC microcontroller directly feeds the eight servos that are currently implemented (the schematic below shows all 18 potential servo connections.) The servos currently implemented are LFS, LFK, RFS, RFK, LRS, LRK, RRS, and RRK. (The letters stand for {Left/Right},{Front/Rear},{Shoulder/Knee}, respectively.)
  • The servos are Futaba S3003s, chosen because they’re ubiquitous and cheap. They don’t really have as much torque as I’d like, and I plan on replacing them with something a bit stronger. (This would also allow the robot to carry a larger battery pack, sensors, a WiFi module, etc.)
  • The Bluetooth module is powered by the 3.3V regulator circuit, and connects directly to D0 through D3 on the PIC. Commands from the Android phone control four output lines, which select behaviors by raising or lowering D0 through D3.
  • D4 through D7 are not yet implemented on the PIC, and should be tied to ground.

The servo controller pinout (click for larger). Only the front and rear servo sets are used, and only the shoulder and knee servos. D0 through D7 are the command-select inputs; only D0 through D3 are needed so far. These connect to PIOs 3, 4, 6, and 7, respectively, on the Bluetooth module. (PIO5 was skipped since it cannot be easily controlled.)

Here are all of the files needed to reproduce the robot, so far:

Mintoris Basic source code for phone-based controller (requires Mintoris Basic 4.0 or greater, Bluetooth connectivity, and an accelerometer. Tested on an Epic 4G running Froyo.)

Zipped PIC Assembly project for servo controller PIC (requires Microchip MPLAB, a PIC programmer such as the PICKIT2 or PICKIT3, and a PIC16F887 or similar microcontroller.)

Google SketchUp 8 .skp file for robot chassis and leg pieces (requires Google SketchUp 8 or better.) One chassis and four of each leg piece is needed. I prototyped these using an STL export plugin for SketchUp, and a uPrint 3D printer (controlled with uPrint’s CatalystEX software.) The chassis is shown upside-down in the initial view (shown below); it is printed in this orientation so that it uses significantly less support material when being printed.

Overview of the chassis and leg pieces. (Click for larger.)

Still to be done:

  • Improve the gait, perhaps using a Genetic Algorithm and a physics simulator;
  • Implement the electronics on a single circuit board;
  • Regulate the PIC supply voltage to 5V instead of the current 6V;
  • Find a better / lighter battery pack;
  • Implement onboard sensors and intelligent control;
  • Implement a camera;
  • Implement variable-speed gaits for proportional control;
  • Implement automatic recharging using a docking station;
  • Implement Internet connectivity via WiFi, including web-based controls.


Posted in Android, BASIC, Coding, Digital, Drexel, Electronics, Level 4, PIC Microcontrollers, Projects, Robotics, SIGMA Walking Robot | 8 Comments

A Successful Failure

A2A simulations is building quite a reputation for themselves in the Flight Simulation community. Their attention to detail and focus on creating highly accurate models of important aircraft systems makes flying an A2A aircraft an immersive experience unlike anything else out there in the Flight Sim world. (Their B377 Stratocruiser, which I’ve written about before, is amazing!)

Recently, one of their developers was puzzled by a problem that had been reported when developing their P-40 fighter plane simulation. At high power, the engine would lose power — whereas actual P-40s would not, under the same conditions. There must be a fault in the simulation somewhere, right?

As it turned out, the simulation was working perfectly! In most simulated aircraft, the “engine” is really a straightforward set of equations relating fuel burn, manifold pressure, RPM, and torque/thrust. For simplicity, the internal workings of the engine are treated as a “black box.” On A2A aircraft with their “Accu-Sim” enhancements, though, engine systems are modeled much more accurately. Simulated fuel is pumped, a few cc at a time, into the carburetors, which mix it with air and feed the mixture to the simulated cylinders, which burn the fuel according to each cylinder’s timing, temperature, fuel/air mix, pressure, and other factors. If one of these parameters is incorrect, the cylinder will perform poorly — just as it would in a real engine. Cylinders can miss, for example, causing brief drops in RPM.

Troubleshooting the problem, A2A’s developer took the plane for a short test flight while keeping an eye on the engine instrumentation. He took off at reduced power, put the plane in a climb, then gradually added power. After the engine had been at full power for a while, he noticed the fuel pressure drop, after which the engine cut out.

It turned out that they had “installed” the wrong (simulated) fuel pump — which could not produce the needed fuel flow rate for the P-40’s (simulated) engine, starving it of fuel at high power settings. They’re working on correcting the problem (meaning, creating a higher-volume fuel pump simulation.)

You know you’re on the right track with your aircraft simulation, when diagnosing a failure comes up with a classic aircraft-engine problem, and the simulation gets the failure mode right!


Posted in Aviation, Digital, Flight Simulator, Nostalgia | Leave a comment

Chip packages

The same chip is often produced in several different packages. Here is an example: Microchip’s PIC16F1825 microcontroller, which is available in four different standard packages. The best package for your application depends on several factors. In many cases, it’s a tradeoff of size vs. ease of manufacturing.

One component; four different packages. (Click for larger.)

For hobbyists, DIP (Dual In-Line) form factor, also known as a “through-hole” component, is the easiest to work with. DIP parts (the top chip above is an example) can be used in circuit boards, placed in sockets, or used with solderless breadboards for quick prototyping of new circuits. They’re often quite a bit larger than other packages, though, so they’re not always the best choice for a manufactured product. Mounting DIP parts also requires holes to be drilled in the circuit board — an additional step which can add manufacturing expense.

The second chip from the top is the same 16F1825 microcontroller in SOIC (Small-Outline Integrated Circuit) packaging. SOIC chips are usually smaller than their DIP counterparts, and the leads are closer together. This allows them to take up less space on a circuit board, helping with device miniaturization. In addition, they (and the smaller types) are “surface-mount” (or SMT) components, meaning they do not require any holes to be drilled in the circuit board. They can be trickier to solder to than DIP parts, though, since the leads are closer together. You need a good soldering iron, thin solder, and good technique to solder these correctly.

The third chip from the top is the same 16F1825 microcontroller in TSSOP (Thin-Shrink Small Outline Package) form. It is similar to the SOIC form factor, but with much smaller lead-to-lead spacing. TSSOP parts are probably best handled with solder paste and a reflow oven.

Finally, the two chips at the bottom are in QFN (Quad Flat No-Leads) packaging. QFN-16 is the smallest standard size; for 14-pin parts like the 16F1825, this means that two of the pins are unused. (Two QFN chips are shown; the one on the right is upside-down to show the contacts on the bottom of the chip.) Since the contacts are on the bottom, solder paste and a reflow oven or hot-air rework station are required to work with QFN chips. These can save a lot of circuit board space (and therefore expense) in manufactured products, but can be very difficult to work with for hobbyists.

There are other popular chip packages available, notably “Quad Flat” packaging (QFP, LQFP, TQFP, etc); “Ball Grid Array” (BGA) packaging, and many others. These packages are mostly intended for use in manufacturing, though, although hobbyists continue to come up with novel ways to use them in homebrew devices.


Posted in Components, Electronics, Fundamentals | Leave a comment