A Method To The Madness

A quick look at the values of standard 5% resistors is puzzling. Instead of a nice, logical progression of values (say, 1.0k; 1.1k; 1.2k… 1.9k; 2.0k), the values seem to follow some arbitrary scheme, possibly chosen by a numerologist rather than an engineer.

There’s a reason for this, though — the standard 5% resistor values are chosen based on a specific set of “preferred numbers.” This specific sequence not only ensures continuous coverage of the whole order-of-magnitude sequence (1.0 to 9.9 times a power of ten), but helps cut down on manufacturing defects, as well. Here’s how.

The E24 series, showing complete coverage of the decade from 10-100 within 5% tolerance.

The E24 series, showing complete coverage of the decade from 10-100 within 5% tolerance.

The “E24 series” is chosen so that every possible value, from 1.0 to 9.9999, falls within 5% of one (or two) of the values in the series. This way, any possible desired resistor value can be substituted by a resistor whose value is within the 5% margin of error. More interestingly, resistors can be manufactured with no control whatsoever over the resistance — and as long as their resistance falls somewhere on the scale, they can be binned into a group. A resistor tests out as 992 ohms? Into the 1k bin it goes. Another is 450 ohms? Good enough to go in the 470 ohm bin. All possible values fall into one (or sometimes two) possible bins.

It only seems weird until you think about it.

Posted in Analog, Components, EET201, Electronics, Math | Leave a comment

Portable Soldering Solutions

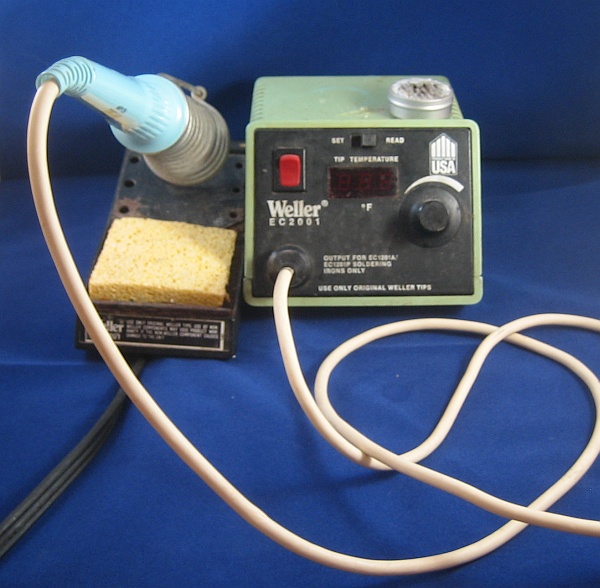
When working on projects in the lab, my choice of soldering solution is usually pretty easy: I just use my Weller EC-2001 temperature-controlled iron. The long, narrow tip that I use works well for the small devices that I typically solder, and the built-in thermostat allows for good control of tip temperature.

When working on projects away from the lab workbench, though, there are several choices of soldering tool available. Unfortunately, none of them are a perfect fit for all situations, but several of them are versatile enough to be quite useful.

Here are several soldering tools I’ve used in the field, along with some of my thoughts on each…


Weller desk iron

My temperature-controlled Weller — my main soldering iron.

This is my go-to soldering iron for my workbench, since it works very well for nearly all of the soldering jobs that I do (everything up to, say, 16-gauge wire or so.) Unfortunately, it’s a real pain to disentangle it from my workbench, lug it to the project site, and find a solid source of AC power for it. Unless I plan to do a lot of soldering near an AC outlet, I leave it on the bench. I got this in pieces at a hamfest years ago (found the base at one table, and the iron at another), so I got the whole thing for about $30 or so. If I’d known how easy the right iron makes soldering, I would have bought one at retail price long ago!


Butane iron

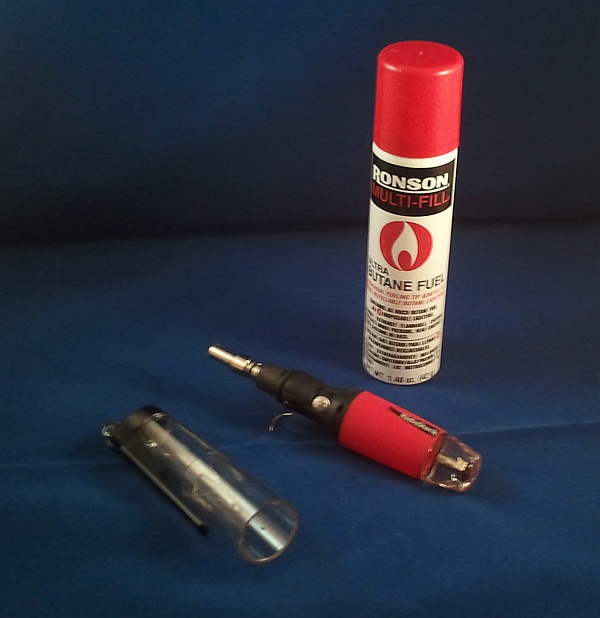
A butane-powered soldering iron / blowtorch. Good for larger jobs, but can easily cook smaller components.

This one is pretty handy. Unlike the other irons, it works by butane combustion: a pilot flame is lit which burns itself out as the mantle comes up to temperature. The iron can be throttled (by which I mean it can be throttled anywhere from “quite high” to “insane.”) It’s the 800lb gorilla of my soldering solutions — lots and lots of power, but it can very easily cook fragile chips before it even gets close enough to solder them. I carry this one along as well, but I tend to use it on larger projects (where it works extremely well.) I’ve been known to use the butane iron in my lab, too, for larger jobs not suited to the Weller iron. Keep a lighter handy, though: the built-in lighter wheel doesn’t always work well.


ColdHeat iron

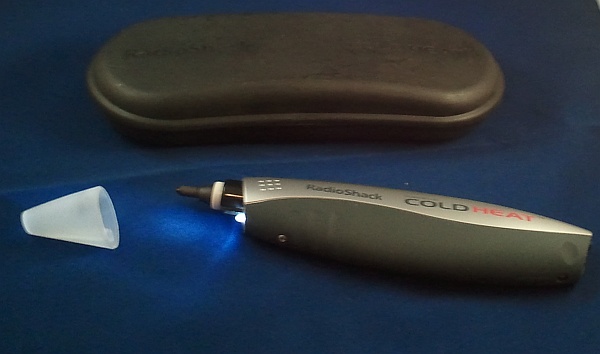
A ColdHeat soldering iron.

Several years ago, I saw an ad for a new kind of battery-powered soldering iron which seemed to almost work without heat (I.E. the tip cooled down very quickly, making the tool inherently a lot safer than most.) I thought this was a cool idea, so I bought one. Roughly ten years later, I still have yet to figure out how to make the damn thing reliably solder anything — small or large. In addition, the electrical arcs that it sometimes emits are very worrisome to someone like me who often works with ESD-sensitive devices. I still have it and try it again every so often, hoping that I’m just doing it wrong. So far, no luck. I’m beginning to think it’s just a gimmick.


Radio Shack battery-powered iron

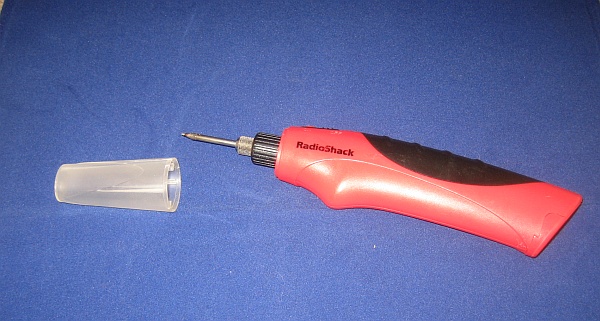
A Radio Shack battery-powered portable soldering iron — easily my second-most-useful iron.

After the very frustrating experience I had with the ColdHeat iron, I almost didn’t buy this one. I mean, come on — a $20 portable soldering iron, small enough to fit in my toolbox, which works on four AA batteries??
I’m very glad I eventually decided to take a chance on it. It is easily the second most versatile iron I have, even ignoring its portability. Only the Weller is better.  Radio Shack’s tools are sometimes hit-or-miss with respect to quality, but they have a winner here. Its only real drawback is that it isn’t very powerful, but combined with the butane iron, it’s a great tool to have along.


Posted in Electronics, Reviews, Tools | Leave a comment

The Heat Is On

Having recently bought a house which was built more than a century ago, I have inherited a fascinating mix of various technologies used from the 1890s to the present — from  sections of the basement that look suspiciously like old coal bins to modern appliances and a 50Mb/sec Internet connection.

One of the not-so-attractive bullet points on the house was the use of baseboard heat throughout. While it’s no doubt effective, the general consensus seems to be that it’s just about the most expensive way to heat a building, short of burning actual hundred-dollar-bills in a fireplace.

A typical baseboard heater.

When I toured the house, however, I noticed an ancient-looking gas furnace in the basement. Would it still work? No way to tell, but the Realtor and I put a clause in the contract to leave the furnace and ductwork in place.
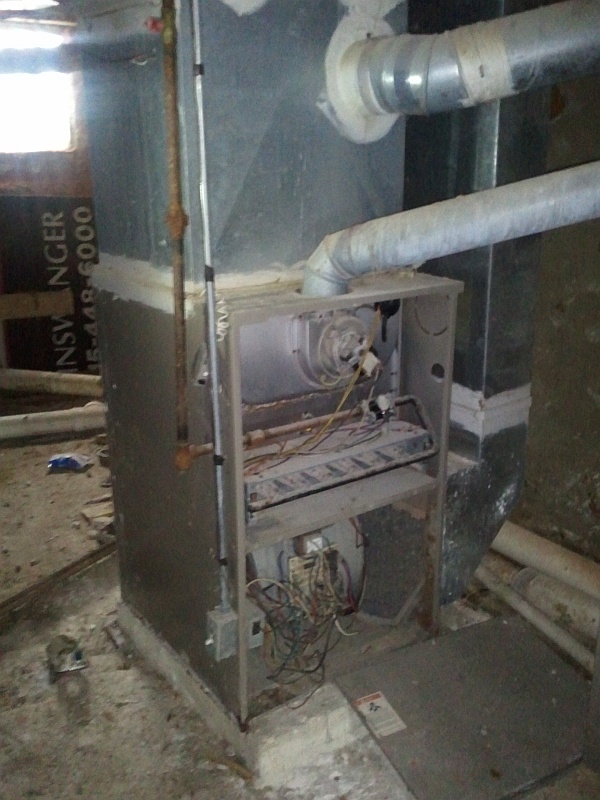
The furnace, as it was when I first saw it.

Perhaps it could be restored, and if nothing else, it would be an interesting objet d’art to add to the existing basement ambiance (sort of a cross between a medieval dungeon, a mineshaft, a wine cellar, and a forgotten Dwarven ruin, complete with bizarre, ancient machinery.)
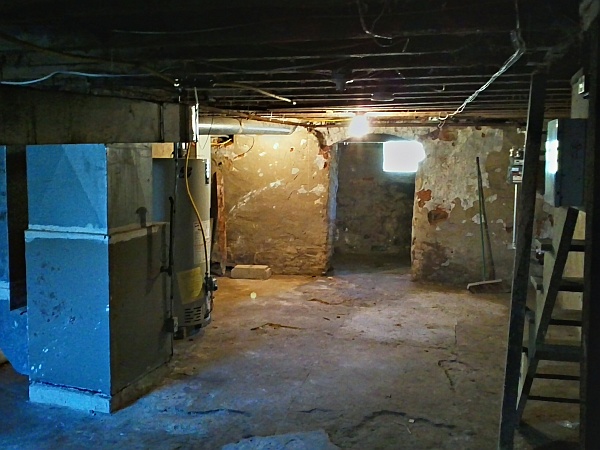
A typical view of part of the basement.

Now that the weather has cooled to a more-or-less reasonable temperature, I was finally able to take a weekend and look at the furnace. First, using a “suicide cord,” I hotwired the inducer fan to test it. It was frozen in place, but a bit of WD-40 and several minutes of working the fan back and forth freed it enough so that the motor could keep it moving. It freed itself up quickly enough after that.

Now that the inducer fan was working, the blower fan was next on the list to be tested. Since it’s a type of motor I’m not familiar with, I decided to try running it through the main control panel. A quick check online came up with the decoder chart for thermostat wiring: Red for 24VAC power; green for the fan, and white for heat. I shorted red to green, applied power, and the main blower started right up — probably for the first time in many years.

Next, the furnace had to be reconnected to the gas line. This was surprisingly easy; Lowe’s had a kit with almost everything needed in one box. Apart from a second trip back for a 3/4″ pipe fitting, the gas line connection problem was solved, and the furnace was reconnected to the branch that had once served it.

The first test-firing displayed a complete lack of anything resembling fire (except for the hot surface igniter, which lit up nicely). A quick check with a voltmeter showed that the gas valve wasn’t getting any power. Hotwiring it to the 24VAC transformer solved the problem, and the gas came on. Well, the first burner did, at least.
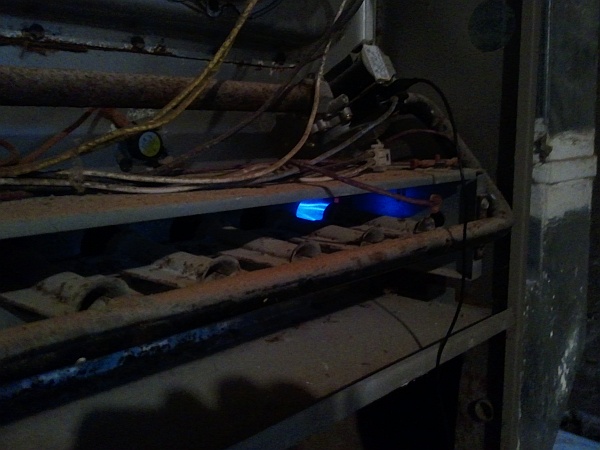
Does it work? Well, technically, yes. Sort of.

Another check online (Google knows everything, or knows someone who does) came up with the explanation that the flame front should propagate from one burner to the next along the “wings” of the burners. If this wasn’t happening, the slots are probably clogged and require cleaning.

When I got the burner assembly out (not trivial, but a lot easier than I thought), it was immediately obvious that it was badly in need of a cleaning.
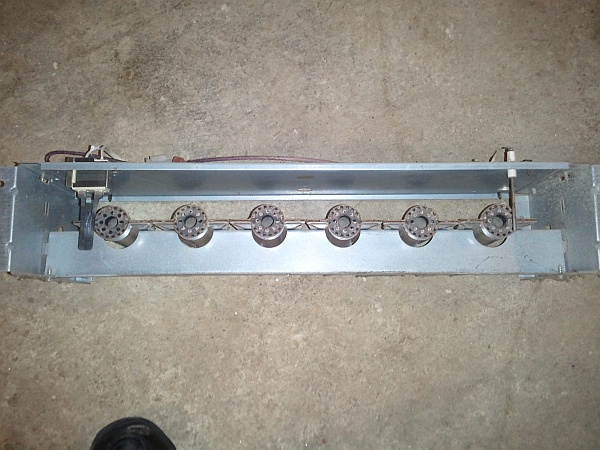
The burners, before cleaning.
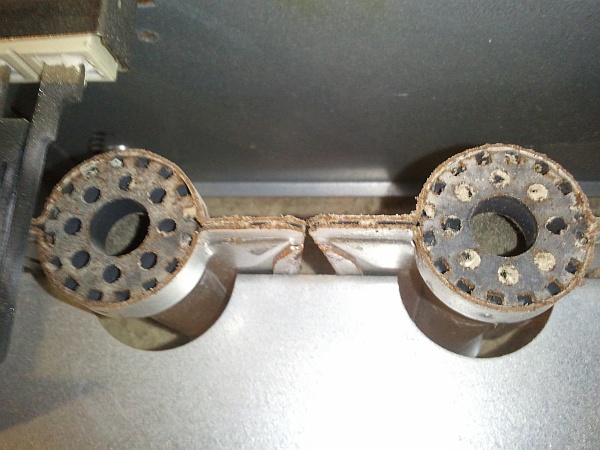
Burner 1 (at left) lit fine, but the flame couldn’t propagate.
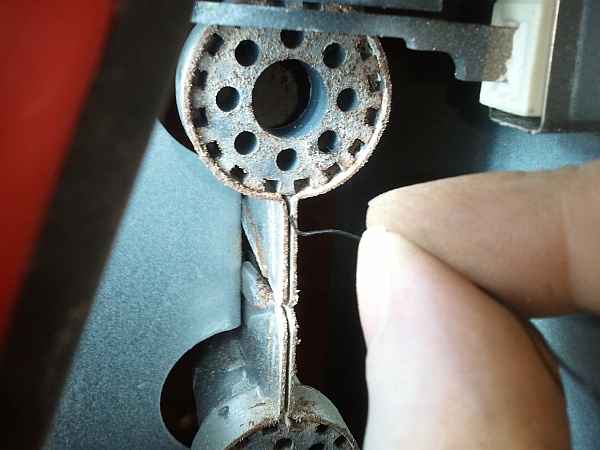
The solution is to clean the “wing” slots out with wire and/or a thin blade.

Burners in gas furnaces incorporate a safety mechanism, involving a thermocouple. The hot-surface igniter is placed next to the burner on one end of the row. Ideally, this burner ignites and the flame front propagates along the row, all the way to the last burner. There, a thermocouple is placed in the path of the last burner’s flame. If this thermocouple detects a flame, the burners have been properly lit, and the furnace can keep the gas on. Otherwise, after two or three ignition cycles, the gas is cut off and the LED flashes an error code. This prevents the furnace from flooding the basement with unburned natural gas.
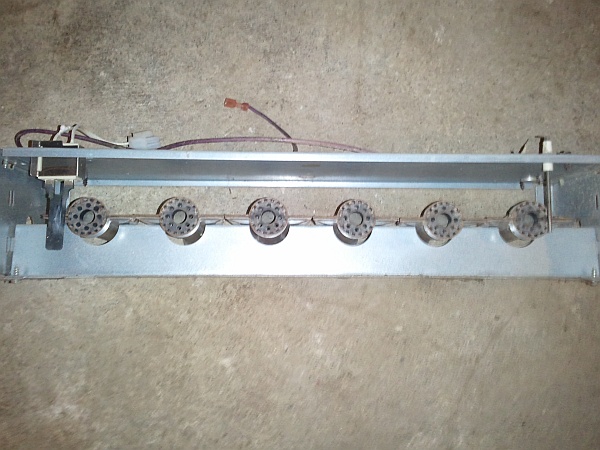
The burners, cleaned out and ready to go back in the furnace.

Once the assembly was back in place, all six burners started up nicely.
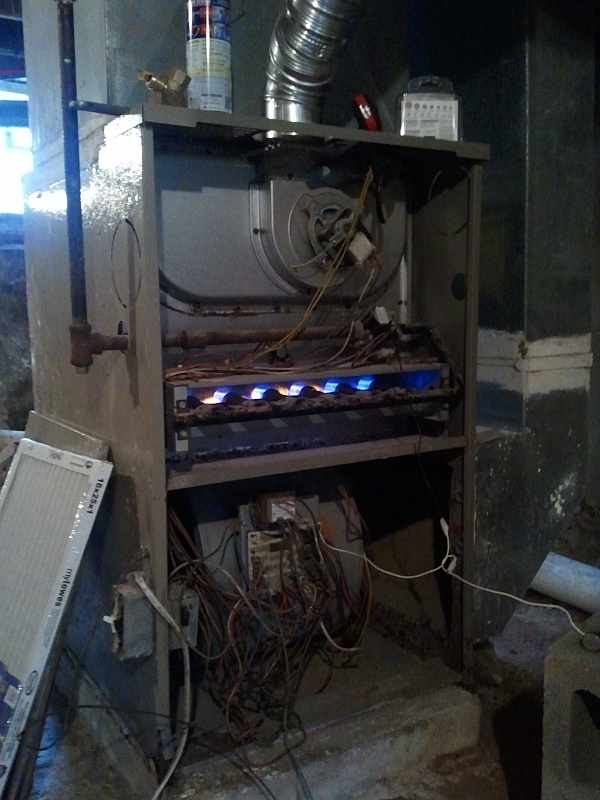
All six burners working. Now we’re cooking with gas!

The next question was, why wasn’t the gas valve getting 24VAC from the control board? Tracing back from the valve, it turns out that two of the switches had failed (most likely from rust.) Wiring around them (temporarily) solved the problem.

The power feed was a mess, so I replaced it with a new switch and ran a power cord back to an GFI outlet below the breaker panel as a semi-permanent solution (with all of the baseboard heat installed, the 200-amp panel was already completely full!)

The next step (and probably harder) will be to trace where all of this ductwork goes. Most of it has been hidden underneath the flooring or behind drywall. But that’s a story for another time…


Posted in Troubleshooting | Leave a comment

Relativity, Visualized

“Video games,” at least among non-gamers, are very underrated. When many people think of “video games” or “computer games,” they probably envision either 1980s-style titles such as Pac-Man — or worse, violent, mindless games such as Doom.

Games, however, have the potential to not only be very worthwhile pastimes — but to inform and educate, as well. Occasionally, a particularly well-conceived game can even let players see the world in a new way, and make extraordinary concepts accessible.

A Slower Speed Of Light,” by the MIT Game Lab, definitely falls into this last category. By calculating the visual implications of motion in a world where the speed of light is significantly slower than the usual 300,000 km/sec, players can see for themselves — interactively and in lurid color — the visual effects of near-light-speed motion.

Carl Sagan, of course, famously introduced relativistic motion to viewers of Cosmos back in the 1980s, along with a good explanation of why these effects occur. With modern computer technology, though — notably high-performance graphics cards — computers can bring such worlds to life and make them interactive.

The game takes only a few minutes to complete, but is an enlightening experience (pardon the pun). It’s a free download, and available for Windows, Linux, and Macintosh computers. Check it out!


Posted in Games, Science | Leave a comment